Just FYI the official MapViewer Primer article can be found here:
http://www.oracle.com/technology/products/mapviewer/mapviewer_training_index.html
It provides a good and concise introduction on MapViewer.
Monday, November 24, 2008
Wednesday, November 19, 2008
Creating a web map from raster image files
This article outlines the steps needed to create a "slippy" web map from a set of raster image files on your disk. The main steps are:
Lets now go through these steps with a bit more detail.
Loading image files into Oracle Spatial
For this we will use the Map Builder tool. If you don't have the latest version of Map Builder, you can get it from OTN MapViewer page. The latest kit is MapViewer version 10.1.3.3 for WebLogic.
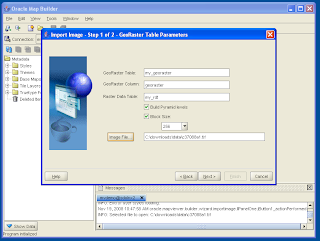
Fire up Map Builder, then go to Tools > Import Image. You will be prompted to enter the name for a GeoRaster table to be created (if you are importing an image for the first time), and a few other things including the raster data table name and georaster column name. You should jot down these names as you will need to enter them again when importing a second image and so forth.
Click Next. You can accept default values for all the fields. Note that the SRID for the georaster data is set to 999999 by default, you should change it if you know the exact Oracle SRID for the image files you are importing. If you do not know the SRID, you should set it to 262148 here. SRID 262148 is a meter-based local coordinate system, and will ensure you can create a tile layer in the last step. Note that you can always update it later to a more accurate SRID.
The slippy Oracle Maps map cannot directly display a MapViewer base map for legacy reasons. It expects a MapViewer tile layer instead. So we need to create a map tile layer out of the base map. For this you will need to use the MapViewer Admin web page. So point your browser to the MapViewer home page, click the Admin icon/button, and login to the Admin page. Click the Management tab, then Manage Map Tile Layers. Click Create, select Internal. Click Continue. And you will see a web page that defines all aspects of the new Tile Layer, such as its name, what is the base map, and so forth. This is illustrated in the following screen shot:
- load the image files into Oracle Spatial and store them as a GeoRaster table
- create a MapViewer theme and base map for the GeoRaster table
- create a MapViewer map tile layer so that the AJAX mapping client can display the data as a slippy map in the browser
Lets now go through these steps with a bit more detail.
Loading image files into Oracle Spatial
For this we will use the Map Builder tool. If you don't have the latest version of Map Builder, you can get it from OTN MapViewer page. The latest kit is MapViewer version 10.1.3.3 for WebLogic.
Fire up Map Builder, then go to Tools > Import Image. You will be prompted to enter the name for a GeoRaster table to be created (if you are importing an image for the first time), and a few other things including the raster data table name and georaster column name. You should jot down these names as you will need to enter them again when importing a second image and so forth.

Click Next. You can accept default values for all the fields. Note that the SRID for the georaster data is set to 999999 by default, you should change it if you know the exact Oracle SRID for the image files you are importing. If you do not know the SRID, you should set it to 262148 here. SRID 262148 is a meter-based local coordinate system, and will ensure you can create a tile layer in the last step. Note that you can always update it later to a more accurate SRID.

Click Next. Then click Finish. Map Builder will start uploading the image file to the database.

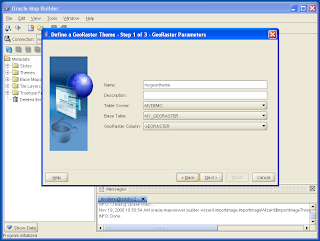
After the image is uploaded and stored in the GeoRaster table, Map Builder will automatically prompt you to create a GeoRaster theme based on the table. A GeoRaster theme is required by MapViewer to visualize your image data. So click Next if this is the first image you just uploaded and there is no GeoRaster theme exists for it.

Enter a name for your new GeoRaster theme, then click Next. Click Next also on the 2nd and 3rd screen of this dialog. Then click Finish. You now have a GeoRaster theme for the image you just uploaded. You can preview this theme in Map Builder to ensure everything so far is working (in other words, you should see your image which is now stored in the database).

If you have more than one image files, just repeat the above steps. Note that you should use the same GeoRaster table name, column name and Raster Data Table name for all subsequent image files. This will ensure that all the image files are stored in the same GeoRaster table in Oracle Spatial. It will also make sure Map Viewer automatically "stitch" your image files when visualizing them. After finishing uploading each image file, MapBuilder will prompt again and ask if you want to create a GeoRaster theme. Click Cancel here since you already created the theme, which will automatically see new image data added to the GeoRaster table.
Creating a MapViewer base map
Now that all of your image files are stored neatly as a GeoRaster table in Oracle Spatial, and MapViewer is (partially) happy because you created a theme based on that table, there remains two more steps for the data to be displayable in a "slippy" map in your browser. First, we need to create a MapViewer Base map that includes/references this theme. Second we need to create a map tile layer which is what the slippy mapping client is expecting.
To create a base map, we will again use Map Builder. Right click on the Base Maps node in the left panel of Map Builder. In the ensuing dialog, enter a name for the new base map. Click Next. In the second screen as shown below, find and select the theme we just created, and click the button with a "+" icon to add the theme to the new base map.

Click Next and Finish. This will create a MapViewer base map that contains just the GeoRaster theme. Again you should be able to preview the base map inside Map Builder and see the same image data.
Creating a Map Tile Layer
The slippy Oracle Maps map cannot directly display a MapViewer base map for legacy reasons. It expects a MapViewer tile layer instead. So we need to create a map tile layer out of the base map. For this you will need to use the MapViewer Admin web page. So point your browser to the MapViewer home page, click the Admin icon/button, and login to the Admin page. Click the Management tab, then Manage Map Tile Layers. Click Create, select Internal. Click Continue. And you will see a web page that defines all aspects of the new Tile Layer, such as its name, what is the base map, and so forth. This is illustrated in the following screen shot:

Note that you will need to make sure proper values are entered for the fields Min X, Min Y, Max X, Max Y, Minimum Map Scale, Max Map Scale and SRID. The fields Min X, Min Y, Max X and Max Y define the coordinates of an imaginary bounding box that covers all the imported images. You should be able to get these values by checking the coordinates in the TFW files. Or you can use Map Builder's preview feature to get a rough estimate since the preview panel displays the coordinate info too.
Min and Max Map Scale define the smallest and largest map scales that the map images should be displayed (or will display reasonablly well in terms of clarity). They are true map scales and you can experiment with different values to get a sense of how they affect the user experience. A value of 1000 means the map scale is 1:1000, which in turn means a unit of distance (say an inch) on the screen represents 1000 same units (inches) on the ground.
The other field, # Zoom Levels, defines how many steps to go from zoomed way out (Max Map Scale) to way in (Min Map Scale). Again, it is okay to experiment with all of these values in case you didnt get it all right the first time. It's not a big deal to delete the current one and start over with a new map tile layer.
Finally, the SRID field should contain the same SRID value you entered when importing images in Map Builder.
Testing your map
So how do you actually know if your map tile layer is created properly? You display it in a simple HTML page! The easiest way is to copy and modify one of the existing Oracle Maps tutorials (each tutorial is one very simple HTML/JavaScript page). Simply replace the map tile name with the one you just created, and set the proper map center point and zoom level for your data. Open the page in your browser and you should see a draggable slippy map showing your image data!
Tuesday, November 4, 2008
draggable magnifying glass on your map
My colleague Ji Yang recently developed some neat code to implement a movable magnifying glass or "microscope" that reveals more details on any spot on the map, without zooming into the map itself.
You can download the simple HTML page that implements this effect here. And here is the icon referenced in the page. The demo works off the sample MVDEMO data set.
The code simply uses the MVMapDecoration and other standard Oracle Maps JavaScript API. The basic idea is to create a duplicate set of MVMapView handle and theme-based FOI layers for the DIV container that serves as the microscope window. Then add this window as a movable Map Decoration object to the main map. The map and themes in the microscope window show things at a different zoom level from the main map to achieve the "amplifying" effect.
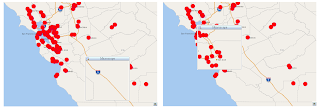
Anyway, here is a quick screen shot with the magnifying glass spotlighting on two different locations on the same map.
You can download the simple HTML page that implements this effect here. And here is the icon referenced in the page. The demo works off the sample MVDEMO data set.
The code simply uses the MVMapDecoration and other standard Oracle Maps JavaScript API. The basic idea is to create a duplicate set of MVMapView handle and theme-based FOI layers for the DIV container that serves as the microscope window. Then add this window as a movable Map Decoration object to the main map. The map and themes in the microscope window show things at a different zoom level from the main map to achieve the "amplifying" effect.
Anyway, here is a quick screen shot with the magnifying glass spotlighting on two different locations on the same map.

Wednesday, October 29, 2008
Generating map legends
In this article we will show at least 3 different ways of generating a map legend. The first two are based on MapViewer's XML API, while the 3rd one is pure HTML and the most flexible. All the examples have been tested against the sample MVDEMO data source.
Approach 1: manually specifying legend entries
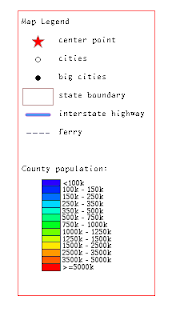
In this approach, we create a map legend image by specifying a map legend element in MapViewer's XML request. Inside the element, we add one legend entry for each style to be displayed as well as some description text. The trick here is to leave MapViewer nothing else to render: no center point, no map bounding box, and no base map or themes either. When MapViewer sees such an otherwise empty map request, it will know to generate an image that is just big enough to contain all the legend entries.
The following is one such sample XML request.
<?xml version="1.0" standalone="yes"?>
<map_request datasource="mvdemo" format="PNG_STREAM">
<legend bgstyle="fill:#ffffff;stroke:#ff0000" profile="MEDIUM" position="SOUTH_EAST">
<column>
<entry text="Map Legend" is_title="true" />
<entry style="M.STAR" text="center point" />
<entry style="M.CITY HALL 3" text="cities" />
<entry style="M.CITY HALL 4" text="big cities" />
<entry style="C.ROSY BROWN STROKE" text="state boundary" />
<entry style="L.PH" text="interstate highway" />
<entry style="L.FERRY" text="ferry" />
<entry is_separator="true" />
<entry text="County population:" />
<entry style="V.COUNTY_POP_DENSITY" tab="1" />
</column>
</legend>
</map_request>
The above request results the following legend image:
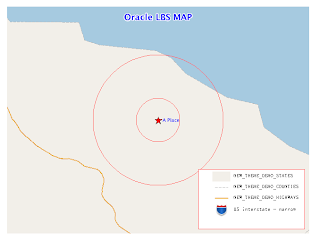
Approach 2: Fully automatic embedded map legend
In this approach, we want to display a map legend as part of the map itself, while without specifying any legend entries. Lets look at the such a map request:
<?xml version="1.0" standalone="yes"?>
<map_request
title="Oracle LBS MAP"
basemap="demo_map"
datasource = "mvdemo"
width="640"
height="480"
bgcolor="#a6cae0"
antialiase="false"
format="PNG_STREAM">
<center size="0.15">
<geoFeature render_style="m.star"
radius="1600,4800"
label="A Place"
text_style="t.Street Name" >
<geometricProperty typeName="center">
<Point srsName="SDO:8307">
<coordinates>-122.2615, 37.5266</coordinates>
</Point>
</geometricProperty>
</geoFeature>
</center>
<legend bgstyle="fill:#ffffff;stroke:#ff0000" profile="MEDIUM" position="SOUTH_EAST">
</legend>
</map_request>
As you can see, the above request specifies a legend element without any actual legend entries inside it. So how will MapViewer create the legend in this case? It actually will look up all the themes that are visible on the result map, and displays all the styles that are used by these themes in the legend area. This is great if you are just feeling lazy and would rather MapViewer handle everything for you. The following is the map with the automatic legend:
For more information about these two approaches and the (sometimes limited) customization options, please check out MapViewer's User Guide.
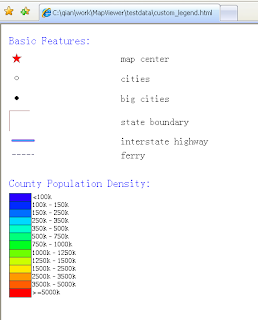
Approach 3: Full manual mode
If you are an advanced user, you most likely will want more than the two approaches we just mentioned. No worries. In the 3rd approach, we will leverage a new MapViewer request to achieve complete control of legend customization and layout. Basically, with a recent MapViewer release (such as 10.1.3.3 for WebLogic), you can now request a 'sample' image of any style from Mapviewer. A typical request URL for a style image looks like this:
http://sdolnx2.us.oracle.com:7777/mapviewer/omserver?sty=M.STAR&w=25&h=25&ds=mvdemo
For the above URL, MapViewer will generate and stream back an image 25 pixels wide and high that shows the style named "M.STAR" from the "mvdemo" data source.
With this kind of style image URL, we can use the regular HTML table and <img> tags to fully customize what, where and how legend entries are displayed. For instance, to replicate the sample legend in Approach 1, we can use the following simple HTML table (you can also use CSS constructs to achieve much fancier layout if you so desire):
<TABLE>
<TR>
<TD>
<Font size="+1" color="blue">Basic Features:</FONT>
</TD>
<TD>
</TD>
</TR>
<TR>
<TD>
<img src="http://sdolnx2.us.oracle.com:7777/mapviewer/omserver?sty=M.STAR&w=25&h=25&ds=elocation">
</TD>
<TD>
map center
<TD>
</TR>
<TR>
<TD>
<img src="http://sdolnx2.us.oracle.com:7777/mapviewer/omserver?sty=M.CITY+HALL+3&w=25&h=25&ds=mvdemo">
</TD>
<TD>
cities
</TD>
</TR>
<TR>
<TD>
<img src="http://sdolnx2.us.oracle.com:7777/mapviewer/omserver?sty=M.CITY+HALL+4&w=25&h=25&ds=mvdemo">
</TD>
<TD>
big cities
</TD>
</TR>
<TR>
<TD>
<img src="http://sdolnx2.us.oracle.com:7777/mapviewer/omserver?sty=C.ROSY+BROWN+STROKE&w=34&h=34&ds=mvdemo">
</TD>
<TD>
state boundary
</TD>
</TR>
<TR>
<TD>
<img src="http://sdolnx2.us.oracle.com:7777/mapviewer/omserver?sty=L.PH&w=45&h=15&ds=mvdemo">
</TD>
<TD>
interstate highway
</TD>
</TR>
<TR>
<TD>
<img src="http://sdolnx2.us.oracle.com:7777/mapviewer/omserver?sty=L.FERRY&w=45&h=15&ds=mvdemo">
</TD>
<TD>
ferry
</TD>
</TR>
<TR> <!-- a separator -->
<TD>
<img src="http://sdolnx2.us.oracle.com:7777/mapviewer/myicons/t.gif" height="15" width="1">
</TD>
<TD>
</TD>
</TR>
<TR>
<TD colspan="2">
<FONT size="+1" color="blue">County Population Density:</FONT>
</TD>
</TR>
<TR>
<TD>
<img src="http://sdolnx2.us.oracle.com:7777/mapviewer/omserver?sty=V.COUNTY_POP_DENSITY&w=180&h=175&ds=mvdemo">
</TD>
<TD>
</TD>
</TR>
</TABLE>
The following is what you will see in a browser:
Approach 1: manually specifying legend entries
In this approach, we create a map legend image by specifying a map legend element in MapViewer's XML request. Inside the element, we add one legend entry for each style to be displayed as well as some description text. The trick here is to leave MapViewer nothing else to render: no center point, no map bounding box, and no base map or themes either. When MapViewer sees such an otherwise empty map request, it will know to generate an image that is just big enough to contain all the legend entries.
The following is one such sample XML request.
<?xml version="1.0" standalone="yes"?>
<map_request datasource="mvdemo" format="PNG_STREAM">
<legend bgstyle="fill:#ffffff;stroke:#ff0000" profile="MEDIUM" position="SOUTH_EAST">
<column>
<entry text="Map Legend" is_title="true" />
<entry style="M.STAR" text="center point" />
<entry style="M.CITY HALL 3" text="cities" />
<entry style="M.CITY HALL 4" text="big cities" />
<entry style="C.ROSY BROWN STROKE" text="state boundary" />
<entry style="L.PH" text="interstate highway" />
<entry style="L.FERRY" text="ferry" />
<entry is_separator="true" />
<entry text="County population:" />
<entry style="V.COUNTY_POP_DENSITY" tab="1" />
</column>
</legend>
</map_request>
The above request results the following legend image:

Approach 2: Fully automatic embedded map legend
In this approach, we want to display a map legend as part of the map itself, while without specifying any legend entries. Lets look at the such a map request:
<?xml version="1.0" standalone="yes"?>
<map_request
title="Oracle LBS MAP"
basemap="demo_map"
datasource = "mvdemo"
width="640"
height="480"
bgcolor="#a6cae0"
antialiase="false"
format="PNG_STREAM">
<center size="0.15">
<geoFeature render_style="m.star"
radius="1600,4800"
label="A Place"
text_style="t.Street Name" >
<geometricProperty typeName="center">
<Point srsName="SDO:8307">
<coordinates>-122.2615, 37.5266</coordinates>
</Point>
</geometricProperty>
</geoFeature>
</center>
<legend bgstyle="fill:#ffffff;stroke:#ff0000" profile="MEDIUM" position="SOUTH_EAST">
</legend>
</map_request>
As you can see, the above request specifies a legend element without any actual legend entries inside it. So how will MapViewer create the legend in this case? It actually will look up all the themes that are visible on the result map, and displays all the styles that are used by these themes in the legend area. This is great if you are just feeling lazy and would rather MapViewer handle everything for you. The following is the map with the automatic legend:

For more information about these two approaches and the (sometimes limited) customization options, please check out MapViewer's User Guide.
Approach 3: Full manual mode
If you are an advanced user, you most likely will want more than the two approaches we just mentioned. No worries. In the 3rd approach, we will leverage a new MapViewer request to achieve complete control of legend customization and layout. Basically, with a recent MapViewer release (such as 10.1.3.3 for WebLogic), you can now request a 'sample' image of any style from Mapviewer. A typical request URL for a style image looks like this:
http://sdolnx2.us.oracle.com:7777/mapviewer/omserver?sty=M.STAR&w=25&h=25&ds=mvdemo
For the above URL, MapViewer will generate and stream back an image 25 pixels wide and high that shows the style named "M.STAR" from the "mvdemo" data source.
With this kind of style image URL, we can use the regular HTML table and <img> tags to fully customize what, where and how legend entries are displayed. For instance, to replicate the sample legend in Approach 1, we can use the following simple HTML table (you can also use CSS constructs to achieve much fancier layout if you so desire):
<TABLE>
<TR>
<TD>
<Font size="+1" color="blue">Basic Features:</FONT>
</TD>
<TD>
</TD>
</TR>
<TR>
<TD>
<img src="http://sdolnx2.us.oracle.com:7777/mapviewer/omserver?sty=M.STAR&w=25&h=25&ds=elocation">
</TD>
<TD>
map center
<TD>
</TR>
<TR>
<TD>
<img src="http://sdolnx2.us.oracle.com:7777/mapviewer/omserver?sty=M.CITY+HALL+3&w=25&h=25&ds=mvdemo">
</TD>
<TD>
cities
</TD>
</TR>
<TR>
<TD>
<img src="http://sdolnx2.us.oracle.com:7777/mapviewer/omserver?sty=M.CITY+HALL+4&w=25&h=25&ds=mvdemo">
</TD>
<TD>
big cities
</TD>
</TR>
<TR>
<TD>
<img src="http://sdolnx2.us.oracle.com:7777/mapviewer/omserver?sty=C.ROSY+BROWN+STROKE&w=34&h=34&ds=mvdemo">
</TD>
<TD>
state boundary
</TD>
</TR>
<TR>
<TD>
<img src="http://sdolnx2.us.oracle.com:7777/mapviewer/omserver?sty=L.PH&w=45&h=15&ds=mvdemo">
</TD>
<TD>
interstate highway
</TD>
</TR>
<TR>
<TD>
<img src="http://sdolnx2.us.oracle.com:7777/mapviewer/omserver?sty=L.FERRY&w=45&h=15&ds=mvdemo">
</TD>
<TD>
ferry
</TD>
</TR>
<TR> <!-- a separator -->
<TD>
<img src="http://sdolnx2.us.oracle.com:7777/mapviewer/myicons/t.gif" height="15" width="1">
</TD>
<TD>
</TD>
</TR>
<TR>
<TD colspan="2">
<FONT size="+1" color="blue">County Population Density:</FONT>
</TD>
</TR>
<TR>
<TD>
<img src="http://sdolnx2.us.oracle.com:7777/mapviewer/omserver?sty=V.COUNTY_POP_DENSITY&w=180&h=175&ds=mvdemo">
</TD>
<TD>
</TD>
</TR>
</TABLE>
The following is what you will see in a browser:

Tuesday, October 21, 2008
MapViewer for WebLogic kit updated
The latest MapViewer release, version 10.1.3.3 for WebLogic, just saw an update yesterday. Please go to http://www.oracle.com/technology/software/products/mapviewer/index.html for immediate download.
This kit is released under the same bundle name (mapviewer10133wls.zip) but the MapViewer component (mapviewer.ear) in it has been updated to include a few last minute bug fixes. If you have experienced issues with Oracle Maps when doing very fast zooming operations, such as FOI features throwing errors or base map tiles disappearing, then you want to download and deploy this latest kit.
Note again that while this kit is certified on WebLogic Servers, you can also deploy it to all 10.1.3.* versions of OC4J standalone and Oracle App Server. This kit also supersedes all previously released MapViewer 11g previews in functionality and stability.
thanks
LJ
Monday, October 6, 2008
Displaying labels on your FOI objects
You probably noticed that by default, none of the clickable Feature of Interest objects displayed on your map has any label text on it. So how to add labels to your FoIs? There are different approaches based on how your FOI objects are created, and also their geometric types.
Adding an index label to your markers
If your theme-based FOI layer is composed of exclusively Point-type objects (markers), you have an option to automatically attach a sequence number or letter to each marker displayed on the map. This is very useful if all you want to do is to index each marker object and be able to cross-reference them in a list that shows the same objects in a tabular form. The method you will use is MVThemeBasedFOI.enableMarkerSequence( enabled, type). Please check out the online API doc for details on this method. The following screenshot shows how such a map looks like:
Note that in order to make the index number or letter inside each marker visible, you need to make sure the Marker style used by your theme is big enough for the label. Also make sure the color of the text is set to a different color of the marker itself. In the above map, the theme uses a circle Marker style, and it is filled with red color. So you need to make sure it does not use a red color for its text. To change the text color (and font/size if needed), open the Marker style in Map Builder, click the Marker Text button and change the text color. This is shown in the following screen shot:

Individual marker FOI objects
If you manually create and place individual FOI objects on the map, for instance by using the MVFOI.createMarkerFOI() and mapview.addFOI() methods, then it is very easy to add label text to each marker. It is shown in the built-in Oracle Maps tutorial mapviewer/fsmc/tutorial/samples/FOIMarker.html. Look for the statement containing setHTMLElement("#1",20,20), which is the exact method you will use to set a label on top of the marker you are creating.
Theme-based FOI layer
If you are displaying a pre-defined theme based FOI layer, and you want to display a label on each feature of interest, there is a method on MVThemeBasedFOI that does just that: enableLabels(true). Note that this method will work provided the following conditions are met:
1. The theme has label enabled (in other words, if you submit this theme in a plain XML map request the resulted map image should display labels on your theme).
2. The features are of polygon type. If your FOIs are of linestring or point type, the method enableLabels() does nothing for you, unless you enable whole-image rendering for the FOI layer.
Dynamic theme based FOI layer
If you are displaying a JDBC/Dynamic theme based FOI layer, and want to display a label on each feature, simply call the same MVThemeBasedFOI.enableLabels(true) method on your FOI layer. You just need to make sure that your dynamic theme actually contains a label column in its SELECT list, and tell MapViewer the name of that label column as well as the labeling style to be used. As an example, I modified the buffer theme in the built-in tutorial /mapviewer/fsmc/tutorial/samples/jdbcThemeBasedFOI.html to display the label "A1" on each buffer zone:
function updateBuffer()
{
...
baseQuery = "select 'A1' as label, sdo_geom.sdo_buffer(A.location, "+radius+
", 0.005, 'unit=mile arc_tolerance=0.005') location "+
" from "+theme+" A" ;
var theme = '<themes>' +
'<jdbc_query asis="true" spatial_column="location" jdbc_srid="8307" ' +
'render_style="'+bufferStyle+'" datasource="mvdemo" label_column="label" label_style="T.CITY NAME" >' + baseQuery +
'</jdbc_query></theme></themes>' ;
buffertheme = new MVThemeBasedFOI('buffertheme',theme);
buffertheme.setBringToTopOnMouseOver(true);
buffertheme.enableLabels(true);
mapview.addThemeBasedFOI(buffertheme);
...
}
Adding an index label to your markers
If your theme-based FOI layer is composed of exclusively Point-type objects (markers), you have an option to automatically attach a sequence number or letter to each marker displayed on the map. This is very useful if all you want to do is to index each marker object and be able to cross-reference them in a list that shows the same objects in a tabular form. The method you will use is MVThemeBasedFOI.enableMarkerSequence(

Note that in order to make the index number or letter inside each marker visible, you need to make sure the Marker style used by your theme is big enough for the label. Also make sure the color of the text is set to a different color of the marker itself. In the above map, the theme uses a circle Marker style, and it is filled with red color. So you need to make sure it does not use a red color for its text. To change the text color (and font/size if needed), open the Marker style in Map Builder, click the Marker Text button and change the text color. This is shown in the following screen shot:

Individual marker FOI objects
If you manually create and place individual FOI objects on the map, for instance by using the MVFOI.createMarkerFOI() and mapview.addFOI() methods, then it is very easy to add label text to each marker. It is shown in the built-in Oracle Maps tutorial mapviewer/fsmc/tutorial/samples/FOIMarker.html. Look for the statement containing setHTMLElement("#1",20,20), which is the exact method you will use to set a label on top of the marker you are creating.
Theme-based FOI layer
If you are displaying a pre-defined theme based FOI layer, and you want to display a label on each feature of interest, there is a method on MVThemeBasedFOI that does just that: enableLabels(true). Note that this method will work provided the following conditions are met:
1. The theme has label enabled (in other words, if you submit this theme in a plain XML map request the resulted map image should display labels on your theme).
2. The features are of polygon type. If your FOIs are of linestring or point type, the method enableLabels() does nothing for you, unless you enable whole-image rendering for the FOI layer.
Dynamic theme based FOI layer
If you are displaying a JDBC/Dynamic theme based FOI layer, and want to display a label on each feature, simply call the same MVThemeBasedFOI.enableLabels(true) method on your FOI layer. You just need to make sure that your dynamic theme actually contains a label column in its SELECT list, and tell MapViewer the name of that label column as well as the labeling style to be used. As an example, I modified the buffer theme in the built-in tutorial /mapviewer/fsmc/tutorial/samples/jdbcThemeBasedFOI.html to display the label "A1" on each buffer zone:
function updateBuffer()
{
...
baseQuery = "select 'A1' as label, sdo_geom.sdo_buffer(A.location, "+radius+
", 0.005, 'unit=mile arc_tolerance=0.005') location "+
" from "+theme+" A" ;
var theme = '<themes>
'<jdbc_query asis="true" spatial_column="location" jdbc_srid="8307" ' +
'render_style="'+bufferStyle+'" datasource="mvdemo" label_column="label" label_style="T.CITY NAME" >' + baseQuery +
'</jdbc_query></theme></themes>' ;
buffertheme = new MVThemeBasedFOI('buffertheme',theme);
buffertheme.setBringToTopOnMouseOver(true);
buffertheme.enableLabels(true);
mapview.addThemeBasedFOI(buffertheme);
...
}
Tuesday, September 30, 2008
APEX, Oracle Maps and Secure Mapping
One interesting feature in the latest MapViewer kit (10.1.3.3 for WebLogic Server) is the built-in support for secure mapping.
So what is it? Basically, it is a way for you to pass the name of an authenticated Web user to a database context where a theme's query will be executed. Your database session can then utilize this piece of information to filter or modify what the theme's query returns. As you probably already know, every MapViewer theme (pre-defined or JDBC/dynamic) results in a SQL query being executed in the database. More specifically, MapViewer obtains a JDBC connection from the connection pool associated with a data source and executes the query in the session of that connection.
Since it is a shared connection pool, how do you pass a web user's name to each theme's connection or DB session? The way MapViewer does it, is to always execute a 'before' and an 'after' PL/SQL procedure around the actual execution of the theme query. In the 'before' PL/SQL procedure, MapViewer passes in the currently logged in Web user's name (or role, or any piece of info you desire). What the PL/SQL procedure does with this piece of information, is up to you, the author of this PL/SQL procedure. You could, for instance, set up some VPD policy or a view that filters the query result based on the web user name. The 'after' procedure simply lets you do some clean-up if necessary.
So where does MapViewer get this authenticated Web user in the first place? Typically it gets this piece of information from an authenticated J2EE session (that MapViewer can access with each and every incoming map request). Now, what happens if your user authenticates to APEX (Oracle Application Express), then communicates directly with the MapViewer server? In this case, there is no separate authentication with the J2EE server that MapViewer is running on, and the APEX authenticated user is not visible to the J2EE server (hence MapViewer). Don't worry, MapViewer also lets you pass an authenticated Web user's name through a Cookie. So in order to pass the APEX authenticated user's name to MapViewer, you simply setup a cookie within the APEX context so that this cookie accompanies every request going to MapViewer.
So how do you tell MapViewer to pick up this web user name from a named cookie (instead of the default place which is a J2EE session)? You do so by adding a few attributes to the MapViewer data source definition. In fact, you also mention the PL/SQL package name (containing the "before" and "after" procedures) in the same data source definition. Here is an example:
<map_data_source name="mvdemo"
jdbc_host="stadb32.us.oracle.com"
jdbc_sid="mv"
jdbc_port="25650"
jdbc_user="mvdemo"
jdbc_password="!mvdemo"
jdbc_mode="thin"
number_of_mappers="5"
allow_jdbc_theme_based_foi="true"
plsql_package="web_user_info"
web_user_type="MON_USER"
/>
The first bold-typed attribute, plsql_package, tells MapViewer which database package it should execute around theme queries. The second bold attribute, web_user_type, tells MapViewer where to pick up the authenticated Web user name.
The possible values for the web_user_type attribute are:
"J2EE_USER" : tells MapViewer to get the authenticated user name from a J2EE session
"OSSO_USER" : tells MapViewer to get the authenticated user from an OSSO (Oracle Single Sign On) session
"<Cookie Name>" : tells MapViewer to get the authenticated user from a cookie; cookie name is case insensitive. In the above example, the name of the cookie containing the authenticated user name is "MON_USER".
So that's the gist of it. For more detailed explaination on this new MapViewer feature, please check out the MapViewer User's Guide (section 1.8) that comes with MapViewer version 10.1.3.3 for WebLogic. Note that this version of MapViewer works equally well with Oracle App Server 10g or standalone OC4J even though it says "for WebLogic Server".
A secure MVDEMO mapping demo
If you want to run an actual secure mapping demo based on the MVDEMO data set, you should check out this short article describing all the required steps and how to run the demo itself. Note this demo runs in a standalone OC4J or Oracle App Server environment, not in APEX, although you can make simple modifications so that it works in APEX or any other environment. Note also that you will need to use the MVDEMO data set that comes with the latest MapViewer kit mentioned above as it includes the necessary setup scripts for this demo.
Setting up a cookie with user name in Apex
My colleague Carsten Czarski sent me this tip in case you are wondering how to actually setup a cookie in Apex so that it contains the login user name. Basically your Set Username Cookie process in Apex login page 101 should look like this:
begin
owa_util.mime_header('text/html', FALSE);
owa_cookie.send(
name=>'LOGIN_USERNAME_COOKIE',
value=>lower(:P101_USERNAME));
owa_cookie.send(
name => 'MON_USER',
value => :P101_USERNAME,
path => '/mapviewer',
domain => 'myhost.com');
exception when others then null;
end;
The above bold text creates a cookie named MON_USER in the current Apex session. This cookie will be sent to MapViewer along with every map/FOI request. Note especially the pieces about path and domain as they are very important, without these the cookie MON_USER won't reach MapViewer since it is likely running on a different path and domain from APEX.
Note also this will make sure the default LOGIN_USERNAME_COOKIE is still there (in case other pages of your APEX application depends on this cookie).
Monday, September 29, 2008
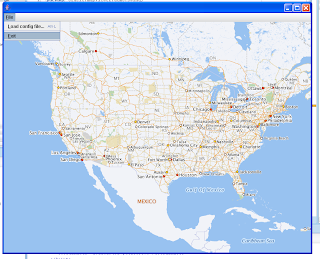
Displaying map tiles in your Java Swing app
Recently I was asked about how to display map tiles served by a remote MapViewer server in a Swing desktop application. I have since written a simple Swing application that does just that. You can get the complete source code here. The sample application connects directly to our hosted eLocation server (elocation.oracle.com) and displays an initial map of the continental USA. You can use double-click (or + and - keys) to zoom in/out, and the 4 arrow keys to navigate or pan the map. Here is a snapshot:
When you download the source code bundle, you will find the following files (in various sub-directories):
SwingMapViewer.jws : the Oracle JDeveloper workspace file. If you have the latest (11g tech preview 4) version of JDeveloper, you can just double click this file to open the entire project and compile/run this sample. If you are using another Java IDE, simply make sure the mvclient.jar (described below) is in your project's class/library path.
Main.java : the main driver class. it asks for a few command-line params (such as where is your MapViewer instance and what map tile layer you want to display) and sets up the configuration for the rest of the application.
MapConfig.java : this class configures the application for such things as MapViewer URL, map tile layer name, data source name, initial map display center and zoom level as well as SRID et al. By default it reads such info from the mapconfig.properties file so you just need to edit that file if you want to display your own map tiles.
MapPanel.java : this class provides the display area in the form of a Java JPanel. It also registers a few listeners to handle events such as mouse click and key presses (for simple navigation).
MapDelegate.java : this is the most important class. It uses the MapViewer Java bean API to communicate with the remote MapViewer instance in response to events from the MapPanel class. So all the actual display/zoom/pan actions are implemented in this class. In truth this class simply delegates everything to the MapViewer bean API (composed of a single class oracle.lbs.mapclient.MapViewer) which is doing all the heavy lifting.
mvclient.jar : this is the Jar file containing the MapViewer Java bean API classes. Make sure it is on your project classpath.
Friday, September 26, 2008
Photos from Oracle Openworld
As promised, here are a few quick snapshots from this year's Openworld held at the Moscone Center in downtown San Francisco. It is one of the largest Oracle user conferences with over 40k attendees. The two Spatial/MapViewer booths received a steady flow of visitors and it was great meeting a lot of customers and partners!
Billboards all over the conference area:

As usual, Oracle had to completely take over a few street blocks in order to have enough space for everyone to sit and meet :)

A nice lunch area in the garden near Moscone center:

Some indoor snapshots:


Wednesday we had a night of entertainment on the Treasure island:

This year there were 4 bands doing live music, Seal (my personal favorite), Elvis Costello, UB 40 and Allan Jackson.

Billboards all over the conference area:
As usual, Oracle had to completely take over a few street blocks in order to have enough space for everyone to sit and meet :)
A nice lunch area in the garden near Moscone center:
Some indoor snapshots:
Wednesday we had a night of entertainment on the Treasure island:
This year there were 4 bands doing live music, Seal (my personal favorite), Elvis Costello, UB 40 and Allan Jackson.
Wednesday, September 24, 2008
Latest MapViewer kit released
Just want to let you know that we posted the latest MapViewer kit for WebLogic server on OTN. Just go to otn.oracle.com then search for "MapViewer" and you will find the kit under the software section of the MapViewer page.
This kit is identical to the previously released (but short-lived) 10g patch 5 kit. We want to emphasize the support for WebLogic server so that's why we pulled the patch 5 kit and re-packaged it as MapViewer 10.1.3.3 for WebLogic. Note that even though it is "branded" as for WebLogic, it works just fine with your existing 10g versions of Oracle App Server or OC4J standalone.
Note also that this kit contains all the features that were available in various MapViewer 11g preview kits. So if you are currently using MapViewer 11g preview, upgrade now to this latest official kit!
Finally, I'm at the Oracle OpenWorld conference this week in San Francicso. This year we have two booths in the exhibition hall, one for Spatial and one for MapViewer! Traffic has been steady and it was fun meeting a lot of MapViewer/Spatial users in person. I hope to upload some conference photos later after I get back home.
regards
LJ
Friday, September 19, 2008
Oracle MapViewer: a primer
I just finished up a primer article introducing basic concepts and setups of MapViewer. Feel free to check it out here. Hope it helps people that are new to MapViewer; it even includes a mini introduction to Oracle Spatial!
Thursday, September 18, 2008
World mercator projection used by Oracle's eLocation site
World Mercator (srid 54004) is a projection coordinate system widely used by tile based online mapping services. Map tiles (elocation.world_map) served by elocation.oracle.com are rendered in this coordinate system. However Oracle Database products prior to version 11g R2 does not support this coordinate system out of box. To add support for this coordinate system to your database, you need to execute the following SQL statements when connect as a DBA user.
INSERT INTO sdo_coord_ops ( coord_op_id, coord_op_name, coord_op_type,
source_srid, target_srid, coord_tfm_version, coord_op_variant,
coord_op_method_id, UOM_ID_SOURCE_OFFSETS, UOM_ID_TARGET_OFFSETS,
information_source, data_source, show_operation, is_legacy,
legacy_code, reverse_op, is_implemented_forward, is_implemented_reverse)
VALUES ( 54004, 'World Mercator', 'CONVERSION', null, null, '', null,
9804, null, null, null, null, 1, 'FALSE', null, 1, 1, 1);
insert into MDSYS.SDO_COORD_OP_PARAM_VALS (
COORD_OP_ID, COORD_OP_METHOD_ID, PARAMETER_ID, PARAMETER_VALUE,
PARAM_VALUE_FILE_REF, UOM_ID) VALUES (
54004, 9804, 8801, 0,
NULL, 9102);
insert into MDSYS.SDO_COORD_OP_PARAM_VALS ( COORD_OP_ID,
COORD_OP_METHOD_ID, PARAMETER_ID, PARAMETER_VALUE,
PARAM_VALUE_FILE_REF, UOM_ID) VALUES (
54004, 9804, 8802, 0, NULL, 9102);
insert into MDSYS.SDO_COORD_OP_PARAM_VALS ( COORD_OP_ID,
COORD_OP_METHOD_ID, PARAMETER_ID, PARAMETER_VALUE,
PARAM_VALUE_FILE_REF, UOM_ID) VALUES (
54004, 9804, 8805, 1, NULL, 9201);
insert into MDSYS.SDO_COORD_OP_PARAM_VALS ( COORD_OP_ID,
COORD_OP_METHOD_ID, PARAMETER_ID, PARAMETER_VALUE,
PARAM_VALUE_FILE_REF, UOM_ID) VALUES (
54004, 9804, 8806, 0, NULL, 9001);
insert into MDSYS.SDO_COORD_OP_PARAM_VALS ( COORD_OP_ID,
COORD_OP_METHOD_ID, PARAMETER_ID, PARAMETER_VALUE,
PARAM_VALUE_FILE_REF, UOM_ID) VALUES (
54004, 9804, 8807, 0, NULL, 9001);
INSERT INTO sdo_coord_ref_system ( srid, coord_ref_sys_name,
coord_ref_sys_kind, coord_sys_id, datum_id, geog_crs_datum_id,
source_geog_srid, projection_conv_id, cmpd_horiz_srid, cmpd_vert_srid,
information_source, data_source, is_legacy, legacy_code, legacy_wktext,
legacy_cs_bounds, is_valid, supports_sdo_geometry) VALUES (
54004, 'World Mercator', 'PROJECTED', 4499, null, 6326, 4326, 54004,
Null, Null, null, null, 'FALSE', null, null, null, 'TRUE', 'TRUE');
COMMIT ;
Tuesday, September 16, 2008
How to read the logs generated by MapViewer
The log records generated by MapViewer at the server side are crucial when you need to diagnose any MapViewer issues. A while ago I wrote a short piece trying to explain what the log records look like and how to interpret them. You can grab it here.
For 11g we are also working on a web-based log viewer that can be accessed right from MapViewer's home page.
For 11g we are also working on a web-based log viewer that can be accessed right from MapViewer's home page.
Oracle Maps and APEX
I recently wrote a short white paper on how to integrate MapViewer/Oracle Maps with Oracle Applicatin Express, the quick and easy database application development environment. You can find the white paper here.
Friday, September 12, 2008
GeoRSS support in Oracle Maps
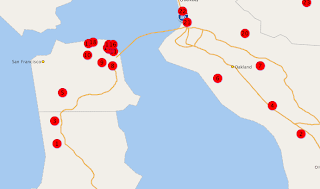
Starting with the latest Mapviewer kit (10g patch 5, a.k.a 10.1.3.3 for WebLogic), you can easily display an external GeoRSS feed as a FOI layer on top of your tile layer. In fact, your MapViewer installation comes with some GeoRSS tutorials, such as tutorial #58. Its full URL is http://<host>:<port>/mapviewer/fsmc/tutorial/samples/georss-demo.html.
That page displays the United States continental states. Below the map you will see a text field where you can enter a custom URL to some external GeoRSS feed. If you want to see a feed that contains pictures (who doesn't!), you can try this Flickr photo stream feed:
http://api.flickr.com/services/feeds/geo/?id=35468159852@N01
(My colleague Jayant sent me this feed so you will have to ask him why this particular feed is chosen).
You will see a map like this (after zooming into the San Francisco city area):

Note that if your MapViewer is running behind a firewall, you will need to setup the web proxy stuff in mapViewerConfig.xml (check the User's Guide on instructions).
That page displays the United States continental states. Below the map you will see a text field where you can enter a custom URL to some external GeoRSS feed. If you want to see a feed that contains pictures (who doesn't!), you can try this Flickr photo stream feed:
http://api.flickr.com/services/feeds/geo/?id=35468159852@N01
(My colleague Jayant sent me this feed so you will have to ask him why this particular feed is chosen).
You will see a map like this (after zooming into the San Francisco city area):
Note that if your MapViewer is running behind a firewall, you will need to setup the web proxy stuff in mapViewerConfig.xml (check the User's Guide on instructions).
Wednesday, September 10, 2008
Cross-domain Oracle Maps scripting
First, yes you can use Oracle Maps (the JavaScript/Ajax API) in a cross domain fashion. In other words, the script in your application page can interact or connect to a remote MapViewer server that is on a different domain than where your application page originates from.
Beware though you must be using the 10g Patch 4 (10.1.3.3 patch 4) or 10g Patch 5 (10.1.3.3 patch 5) versions of MapViewer. The original MapViewer production release (10.1.3.1) does not support cross-domain usage out of the box!
Assuming you have the correct version of MapViewer server installed, here is how to do cross-site Oracle Maps scritping. First let's assume your application page is accessed as http://www.fooA.com/myapp.html. And the proper version of mapViewer server is accessed via http://www.fooB.com/mapviewer/.
1. Always import the oraclemaps.js that comes from the correct MapViewer server. Do not use any cached or old copy of oraclemaps.js that is from an older version of MapViewer. You should copy the oraclemaps.js file from the mapviewer site and host it on your application page's web server, then import this library into your code.
2. Specify the MapViewer server URL in your map tile layer and theme-based FOI layer constructor.
This is the key. In order to interact with a MapViewer server that is running on
a different domain from where your application page is hosted, you must explicitly
specify the URL of the MapViewer tile server (for map tile layers) and FOI server (for
theme-based FOI layers) in your code where you construct the tile layer or FOI
layer. For example:
mapview.addMapTileLayer(new MVMapTileLayer("mvdemo.demo_map",
"http://www.fooB.com/mapviewer/mcserver"));
var customers = new MVThemeBasedFOI('foitheme1','mvdemo.customers',
'http://www.fooB.com/mapviewer/foi');
And that's all you need to do! For more info, check out the JSDoc for the MVMapTileLayer and
MVThemeBasedFOI classes.
Getting more diagnostic info out of MapViewer
There are a few undocumented tricks that you can use to get more diagnostic info out of MapViewer.
In-memory geometry cache status
One area is about the health or general status of the internal geometry cache. As you probably know MapViewer usually caches geometry data of pre-defined themes as they go through the rendering pipeline. The status (such as total bytes of data being cached) of this in-memory only geometry data cache can be obtained by adding a "report_stats" attribute to the <spatial_data_cache> tag of the mapViewerConfig.xml file:
<spatial_data_cache max_cache_size="64"
report_stats="true"
/>
After restarting mapViewer, you will see periodic dumps of the in-memory geometry cache status in the MapViewer log file.
Connection pool status
As you know mapViewer uses a JDBC connection pool for each data source. You can obtain information about these connection pools such as number of active connections. To do so, simply add an element to the <logging> tag in mapViewerConfig.xml:
<logging log_level="finest" log_thread_name="false"
log_time="true">
<log_output name="System.err" />
<!-- a file-based log stream. -->
<log_output name="../log/mapviewer.log" />
<!-- dump datasource info every two minutes -->
<monitor_data_sources value="true" interval="120" />
</logging>
After restarting Mapviewer, you will see a dump of the connection pool info for each data source every two minutes (120 seconds) in the log file.
Usage of mappers and connections
[Note: this trick only works with the 10g Patch 5 release of MapViewer]
Sometimes you want to know if you have configured enough number of mappers for a particular data source, and/or if you have enough connections to serve your map requests. There is a simple XML request that you can send to a running MapViewer to find out. You can send this request from a custom application of yours via standard HTTP Post, or simply use the built-in request forms that comes with your Mapviewer installation.
To do so, point your browser to the MapViewer home page. Then click the Requests tab. In the big text area, clear out everything and paste the following xml request:
<?xml version="1.0" standalone="yes"?>
<non_map_request>
<get_stats/>
</non_map_request>
then click Submit. This will send MapViewer your request. The server will respond with a breakdown of the free/in-use mappers and connections for each defined data source, at the exact moment your request is receved!
MapViewer 10g Patch 5 released
Grab it from OTN here:
http://download.oracle.com/otn/other/mapviewer/mapviewer10133p5.zip
This is the latest MapViewer release. It supersedes all (previously downloadable) 11g preview or early access kits. We are no longer allowed to post 11g preview kits on OTN per Oracle's new policy.
The main things in this patch that worth mentioning are:
1. Certified on WebLogic server version 9, 10 and 10.3 (preview);
2. Works with Apple Safari desktop browser.
3. And many bug fixes to the JavaScript API (and other areas of MapViewer also). Full fixed bug list is in the patch note.
The patch note file is inside the zip file; the zip file itself is about 45 MB.
The included User's Guide has detailed instructions on how to deploy this latest MapViewer on WebLogic Server.
Tuesday, September 2, 2008
MapViewer web resources
The official web site for MapViewer (to get documentation, software et al) is here:
http://www.oracle.com/technology/products/mapviewer/index.html
The official discussion forum (shared with Oracle Spatial) is here:
http://forums.oracle.com/forums/forum.jspa?forumID=76
Other Oracle MapViewer related blogs:
A great blog by colleague Bernhard Fischer-Wasels: http://oracle-maps.blogspot.com/ (mostly in German).
eLocation: a public show case of MapViewer
Oracle's own online mapping server:
http://elocation.oracle.com/elocation/ajax
The above is an online mapping site powered by Oracle's own GeoSpatial products such as Oracle Spatial and MapViewer.
Specifically, the mapping is all done by MapViewer. It uses MapViewer's map tile server to generate and cache map tiles. The map look and feel is created using the Map Builder desktop tool that is part of the MapViewer product.
The geocoding and routing (driving directions) are powered by the GeoCoder and Router component of Oracle Spatial.
Most of the data are purchased from Navteq. All the data are loaded into an Oracle database; this includes all the base map layers such as streets and boundaries/parks/lakes/POIs.
Please be aware that this is an experimental site provided primarily for Oracle's internal use. The site consists of 2 not-so-fast Linux boxes so please be gentle and understanding if it cannot keep up with your requests from time to time :)
New Oracle MapViewer blog
Welcome to my blog on Oracle MapViewer.
My name is Liujian (LJ) Qian and I'm the development manager of the MapViewer product.
Now, a brief introduction on MapViewer.
MapViewer is a web mapping product designed to work with Oracle's Spatial database technologies. It is a middle-tier component that runs inside Oracle's middleware, such as the WebLogic server. You can however deploy MapViewer to other J2EE containers such as JBoss or Tomcat.
We are currently finishing up the next major release of MapViewer which is 11g. As usual it will be released as part of Oracle's Fusion Middleware 11g product, which is currently scheduled for first half of CY 2009.
We are also preparing a new 10g patch for MapViewer which will be available through metalink and OTN.
On the backend, MapViewer connects to one or more Oracle databases where your spatial data are managed. On the frontend, MapViewer provides a comprehensive JavaScript/AJAX mapping API. MapViewer also provides Java and XML APIs. Inside each MapViewer middletire process there is a core rendering engine, a map tile server and a Feature of Interest (FOI) server.
So what distinguishes MapViewer from other online mapping server products? Here are a few that come to mind:
- SQL query driven data layers. A map produced by MapViewer may contain many layers (themes), and each theme is based on a SQL query. MapViewer places no restriction on what kind of query you can have. As long as the query returns spatial data (with or without regular attribute data), MapViewer will treat it as a valid theme and display it.
- Full support of Oracle Spatial database technologies: advanced spatial data models such as Topology, Network Data Model, GeoRaster. Full support of the concept of Workspace (for long transactions), Partitioning, as well as RAC (Real Application Cluster) and Label based security et al.
- A powerful desktop map authoring tool called Map Builder. Map Builder is a Java desktop application. You use it to connect to a database schema and it will discover all the spatial data stored in there. You can then create base maps, themes and rendering styles that suit your business mapping needs. Definitions of such metadata (including styles themselves) are all stored in the database and shared among all MapBuilder and MapViewer instances that connect to the same database schema.
- A very capable Web2.0 JavaScript mapping API that provides interactive draggable map as well as Feature of Interest (FOI) layers that are fully clickable with customizable info window.
- Full integration with many other Oracle products, such as BIEE and Oracle Apps. A native application development wizard is also being built right inside Oracle JDeveloper 11g.
- Takes full advantage of Oracle Middleware features, such as WebLogic's clustering and management functions.
Subscribe to:
Posts (Atom)