- load the image files into Oracle Spatial and store them as a GeoRaster table
- create a MapViewer theme and base map for the GeoRaster table
- create a MapViewer map tile layer so that the AJAX mapping client can display the data as a slippy map in the browser
Lets now go through these steps with a bit more detail.
Loading image files into Oracle Spatial
For this we will use the Map Builder tool. If you don't have the latest version of Map Builder, you can get it from OTN MapViewer page. The latest kit is MapViewer version 10.1.3.3 for WebLogic.
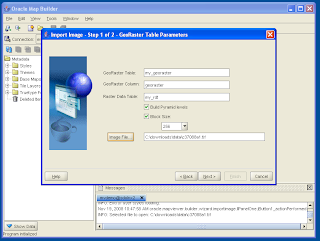
Fire up Map Builder, then go to Tools > Import Image. You will be prompted to enter the name for a GeoRaster table to be created (if you are importing an image for the first time), and a few other things including the raster data table name and georaster column name. You should jot down these names as you will need to enter them again when importing a second image and so forth.

Click Next. You can accept default values for all the fields. Note that the SRID for the georaster data is set to 999999 by default, you should change it if you know the exact Oracle SRID for the image files you are importing. If you do not know the SRID, you should set it to 262148 here. SRID 262148 is a meter-based local coordinate system, and will ensure you can create a tile layer in the last step. Note that you can always update it later to a more accurate SRID.

Click Next. Then click Finish. Map Builder will start uploading the image file to the database.

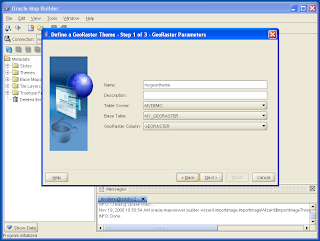
After the image is uploaded and stored in the GeoRaster table, Map Builder will automatically prompt you to create a GeoRaster theme based on the table. A GeoRaster theme is required by MapViewer to visualize your image data. So click Next if this is the first image you just uploaded and there is no GeoRaster theme exists for it.

Enter a name for your new GeoRaster theme, then click Next. Click Next also on the 2nd and 3rd screen of this dialog. Then click Finish. You now have a GeoRaster theme for the image you just uploaded. You can preview this theme in Map Builder to ensure everything so far is working (in other words, you should see your image which is now stored in the database).

If you have more than one image files, just repeat the above steps. Note that you should use the same GeoRaster table name, column name and Raster Data Table name for all subsequent image files. This will ensure that all the image files are stored in the same GeoRaster table in Oracle Spatial. It will also make sure Map Viewer automatically "stitch" your image files when visualizing them. After finishing uploading each image file, MapBuilder will prompt again and ask if you want to create a GeoRaster theme. Click Cancel here since you already created the theme, which will automatically see new image data added to the GeoRaster table.
Creating a MapViewer base map
Now that all of your image files are stored neatly as a GeoRaster table in Oracle Spatial, and MapViewer is (partially) happy because you created a theme based on that table, there remains two more steps for the data to be displayable in a "slippy" map in your browser. First, we need to create a MapViewer Base map that includes/references this theme. Second we need to create a map tile layer which is what the slippy mapping client is expecting.
To create a base map, we will again use Map Builder. Right click on the Base Maps node in the left panel of Map Builder. In the ensuing dialog, enter a name for the new base map. Click Next. In the second screen as shown below, find and select the theme we just created, and click the button with a "+" icon to add the theme to the new base map.

Click Next and Finish. This will create a MapViewer base map that contains just the GeoRaster theme. Again you should be able to preview the base map inside Map Builder and see the same image data.
Creating a Map Tile Layer
The slippy Oracle Maps map cannot directly display a MapViewer base map for legacy reasons. It expects a MapViewer tile layer instead. So we need to create a map tile layer out of the base map. For this you will need to use the MapViewer Admin web page. So point your browser to the MapViewer home page, click the Admin icon/button, and login to the Admin page. Click the Management tab, then Manage Map Tile Layers. Click Create, select Internal. Click Continue. And you will see a web page that defines all aspects of the new Tile Layer, such as its name, what is the base map, and so forth. This is illustrated in the following screen shot:

Note that you will need to make sure proper values are entered for the fields Min X, Min Y, Max X, Max Y, Minimum Map Scale, Max Map Scale and SRID. The fields Min X, Min Y, Max X and Max Y define the coordinates of an imaginary bounding box that covers all the imported images. You should be able to get these values by checking the coordinates in the TFW files. Or you can use Map Builder's preview feature to get a rough estimate since the preview panel displays the coordinate info too.
Min and Max Map Scale define the smallest and largest map scales that the map images should be displayed (or will display reasonablly well in terms of clarity). They are true map scales and you can experiment with different values to get a sense of how they affect the user experience. A value of 1000 means the map scale is 1:1000, which in turn means a unit of distance (say an inch) on the screen represents 1000 same units (inches) on the ground.
The other field, # Zoom Levels, defines how many steps to go from zoomed way out (Max Map Scale) to way in (Min Map Scale). Again, it is okay to experiment with all of these values in case you didnt get it all right the first time. It's not a big deal to delete the current one and start over with a new map tile layer.
Finally, the SRID field should contain the same SRID value you entered when importing images in Map Builder.
Testing your map
So how do you actually know if your map tile layer is created properly? You display it in a simple HTML page! The easiest way is to copy and modify one of the existing Oracle Maps tutorials (each tutorial is one very simple HTML/JavaScript page). Simply replace the map tile name with the one you just created, and set the proper map center point and zoom level for your data. Open the page in your browser and you should see a draggable slippy map showing your image data!
8 comments:
"Note that you will need to make sure proper values are entered for the fields Min X, Min Y, Max X, Max Y, Minimum Map Scale, Max Map Scale and SRID."
How do i get these values for my tiff image? i do have a corresponding tfw file. Any pointers will be of great help.
Cheers
Dev
Hi Dev, I just updated the post to include more info on these fields. So check it out and let me know if you have further questions. thanks.
Got it..thanks.
Though when i supply the values using mapbuilder, i get the error message that says...
"No map data unit conversion information is available. Cannot create mesh rules"
I probably should be specifying these unit conversion info somewhere?
Cheers
The unit conversion issue appears to be caused by the default SRID (999999), which acts as a dummy spatial reference system without any unit info and such. Map Builder is happy to accept it, but when you are creating a tile layer it complains because the tile layer needs to know something about unit in order to properly define a tiling scheme for the image(s). If possible you can try and import the images again, but change the SRID to 262148 in the import wizard. Everything else should stay the same. Sorry for the oversight, I will update the original post also to reflect this.
thanks
LJ
Thanks LJ, will be working on this now. Been busy on some other project.
great example and i think it's the
unique one of it's type thank you
i try this example with San_Francisco_2006_R1C2.TIF
and the results was great but when i try to show the tile in the adf dvt:map component or to view the tile in the browser using preview in the mapbuilder the result was only blue image
why?
Hello,
Of all the things i had searched about map builder, your post was so clear and so useful. Thank you so much. I was infact able to load my own image and create map tile layers too :)
My question :
Now can you tell me how to create a theme for this base map ? a geometry theme or an foi based theme or an image theme...
I would appreciate your help
Regards
Srinivas
p.s: I am trying to load other images using the same technique... But when the image is loaded and it asks whether to create a new Geraster theme, i click NO.
But the Image isnt loading created...!!
HELP....!!!!!
Post a Comment